CLICK HERE FOR FREE BLOGGER TEMPLATES, LINK BUTTONS AND MORE! »
Showing posts with label Prima. Show all posts

Friday, July 22, 2011

Unity Circles Challenge

My first thought for this card was the Unity Blog Challenge; Circles, Circles, Circles and Friday Friends With Flair! 
I knew I wanted a round card, and I knew I wanted black and white. The teal was a happy discovery when my three year old grandson was "helping" me pick colors :)
 The dragonfly was chosen by him too! That may be due to him being terrified of a real one at the beach last week ;) 
The dragonfly is from the Unity Store Kit, Bold Insight. The dragonfly is colored with Copics (BG10, BG13, BG15, and BG18), then I went over it with Copic Spicas in Buttermilk, Gold, and Clear. 
The script on the circle beneath the dragonfly is from Unity's December, 2009 Kit of the Month. It's a big rectangle, but I punched a circle out of it.  


I'm entering this in the Play Date Cafe's challenge 91, Just a Splash. You are to use black and white and just a splash of one other color of your choice. There's still plenty of time to play! 
I'm also linking up to All Things Unity Challenge 35, Wrap It Up, using twine and ribbon. 
Thank you so much for stopping by. I appreciate it so much! And if you leave a comment I will stop by your blog and leave some love too ;) I would love to see your creations!!!
Have an awesome weekend!

Wednesday, July 20, 2011

Soft & Sweet Mojo

I liked Mojo Monday's 200th sketch so much that I made another card using the sketch. This one is a big departure from my last card. 
I've had this Glitz paper hanging around for awhile, and I finally decided to use it. I'm trying to use up the oodles of paper I have sitting around. I'm sure some of you can relate ;)  
I found some cotton lace I wanted to use to make a flower. Luscious stuff ;) I used these tealy Primas I thought I'd never use for the middle with the rose in the very center. The ribbon is made from seam binding dyed with Vintage Pink Glimmer Mist. Such a pretty color.  
 The sentiment is Unity. 
 I even decorated the inside a little.
Thank you for stopping by. I appreciate each and every one of you :) Leave a comment so I can stop by your blog and leave a little blog love for you too!
Have an awesome day!
ETA: Sorry, I forgot to add this to All Thing's Unity's Challenge #35, Wrap it Up.


Monday, July 18, 2011

Card Patterns 124

You know how I love sketch challenges ;)  Card Patterns has a great one this week, pictured below!
A great combination of Sassafras Lass' Indie Girl, Unity Stamp, and some lace, rose ribbon, and pearls make for a sweet soft card. 
 
The Unity stamp I used is from the March, 2010 Kit of the Month, Rockin' It Unity Style. The sentiment is die cut from a Papertrey Ink die, and sponged around the edge.
I kept the trims soft too. The rosebud ribbon is petite and adorable. The diamonds on the right end are cut from the smallest Nestability in the Labels 3 set. I sponged them while they were still in the die.
I even did the inside! I rarely do that ;) 
Thanks for stopping by. I really appreciate your time.
Have a fantastic day!
Supplies
Cardstock: Stampin' Up Marina Mist, Confetti White
Paper: Sassafras Lass Indie Girl
Ink: Momento Tuxedo Black, Tim Holtz Old Paper Distress Ink
Accessories: Pearls - e line by Prima, Lace - Stampin' Up, Rose ribbon - unknown (sorry)
Tools: Punch - Martha Stewart, Dies - Papertrey Ink Fillable Frames #8, Nestabilities Labels 3


Friday, July 15, 2011

A Little Mini

Hello all, and Happy Friday!
That means it's the last day to enter for a chance to be on the design team for Pumpkin Spice ;)
I made the front and back cover for a mini album I'm creating. 
The cover for the album is from Teresa Collins. It was made for the Bind It All, but I decided on ribbon instead. 
The papers I used are from my two Favorite paper lines; Crate Paper's "Restoration Collection" and Echo Park's "For the Record." They worked well together too.  
 Now for some of the How-To's. 
I traced the covers onto the papers and cut them out by hand. I glued the papers to the covers with Mod Podge and sanded the edges, then sponged ink on the edges.
The crochet flowers were white and dyed with re-inkers and water. It's great when you can't find just the right color to be able to dye what you have.
 All of the stamps I used are of course Unity ;)
 I used a lot of Nestabilites for the sentiments and frames for pictures.
These two pages are ready for pictures. There is room under the top left corner of the sentiment panel for a picture to slide in.   
 I can't wait to slide some pics in here. I'm going to add pages as I go along.
Thank you for stopping by! Have a great weekend :)

Supply List
Paper: Crate Paper “Restoration,” Echo Park “For the Record”
Cardstock: Stampin’ Up White Confetti
Stamps: Unity December, 2010 Kit of the Month, Unity October. 2010 Kit of the Month, Unity January, 2011 Kit of the Month
Dies: Spellbinders Nestabilities: Labels 3, Labels 4, Labels 17, Classic Ovals, Classic Scalloped Ovals
Inks: Momento Tuxedo Black, Stampin’ Up Re-inkers – Certainly Celery and Brocade Blue, Tim Holtz Distress Ink – More Mustard, Old Paper, Peeled Paint, Barn Door
Flowers: Crochet - Stampin’ Up, Pink Lace - Bo Bunny, Green and Yellow – Prima
Additional Accessories and Tools: Buttons from my collection, Crochet thread from collection, Vintage fibers, Martha Stewart Scallop Punch

Sunday, July 10, 2011

Mojo Monday Flowers

Getting my Mojo Monday 198 card in just under the wire ;)
 I couldn't find the right color ribbon, so I colored some white seam binding with the Copics I used on the image. Worked out well I think. 
 I wish I would keep my hand out of the way when I take pics! The flowers are Prima.
Thanks for stopping in! 
Have a fantastic day!

Wednesday, July 6, 2011

She

One of my favorite stamps, and I had only used it once before. So much fun to color!
Sorry for the shadow. I took this at night with terrible lighting, but I couldn't wait ;)
 My friend Deb has put tiny rhinestones in the hair of the ladies she has colored and it's beautiful, so I tried it.
I used Sketch 122 from Card Patterns for this card. 
Thanks for stopping by today!
Have an amazing day!

Sunday, July 3, 2011

Distressed Beauty

I wanted to go with a fancy shaped card tonight. 
The way I make a card like this, I cut the full shape out of the designer paper. I then fold a neutral color piece of cardstock in half, and cut it out using the same die, only I leave the fold uncut. Then I mount the designer paper shape on the base. 
 The more I use this stamp, the more I love it! I saw this technique on Laurie's Blog today so I tried it on this stamp. Loved the result! Go check out her gorgeous card and see how she did it. I used Tim Holtz Distress Inks in Tumbled Glass and Shabby Shutters. 
 The stamps are from Unity! 
The flower is from Prima (greener than it looks in the pic). I used a pewter button in the middle with a flatback pearl in the center. 
I am submitting this to Mojo Monday's Sketch #197.
Thanks for stopping by! Hope you're having a great weekend :)

Monday, June 6, 2011

Girlfriend Card

 Deconstructing Jen has another Deconstructed Sketch on her blog. I flipped it to accommodate this gorgeous Unity Stamp from the May, 2009 Kit of the Month (an oldie, but goodie).
The paper is from Pink Paislee's 365 Degrees. 
 I love the little paper ribbon :) It turned out just how I envisioned. It's hard to see in the pics, but after stamping the image I went over it with black and clear Copic Spica Pens. It leaves a nice little shimmer. 
The Prima flower also has some shimmer. It was very pink, and I needed a more red flower, so I sprayed it with Peppermint Stick Glimmer Mist. The rhinestones are from the Lush line by My Mind's Eye. 
The perfect touch :)
Thank you for popping in! 
Have a most fantastic day!!!

Sunday, June 5, 2011

Mojo Monday Sketch

Crate Paper's Restoration Collection is full of gorgeous papers, but I rarely use them. After seeing the Mojo Monday Sketch I decided to make a concerted effort to use it. I am so glad i did! It is such beautiful paper!
 This is a great sketch too! Very fun to do. The end result is great, no matter how you may try to mess it up ;)
 The stamp is from Unity's November 2010 Kit of the Month, Picture Perfect. The inside says. "like how much you mean to me."
I added some Prima Flowers too. I messed with them a little so they didn't look so perfect since the paper is a little shabby. The pink flower wasn't the shade I wanted, so I sprayed it with Vintage Pink Glimmer Mist to tone it down a little. The ribbon was white, and I sprayed it with the Vintage Pink Glimmer Mist also.
The little metal brad is from SU.
Thanks for stopping by! I love company ;) 
I'm off to a grad party. Have a fantastic day!

Sunday, May 1, 2011

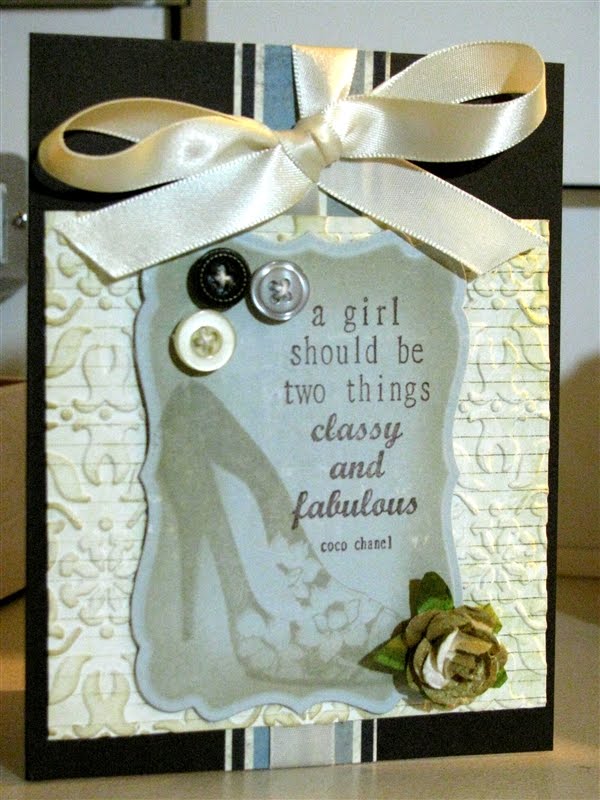
Classy and Fabulous Card

It's Sunday evening and I hope you all had a great weekend.
I felt the need to get into my room and create tonight, so here is what i came up with.
I used Unity stamps of course ;) The shoe is from the Melody Ross set, "All Worth it," and the sentiment is from "Undeniably You."
The paper is My Mind's Eye and Pink Paislee.
These gorgeous buttons are from Lost and Found by My Mind's Eye.
The die cut was cut using a Nestability. I left it in the die when I sponged the edges with Old Paper Tim Holtz Distress Ink. I also stamped the shoe with the same ink so it would look like it was in the background. The cream panel was embossed with a Stampin' Up embossing folder. So pretty :) It was also sponged with the Old Paper ink.
The flower was off white, and it was sprayed with Tattered Angels Olive Vine Glimmer Mist.
Thanks for looking in, and I hope you all have a fabu week!

Thursday, April 21, 2011

Family Banner

I was looking for something to make, and I found these banner pieces that I found in Michaels sometime last year. Perfect! Just the right number to spell Family!

Here are some closeups.

I had nothing to spell out family. All of my chipboard letters are far too small, as are my stickers. I have no letter stamps big enough either. Soooo I printed them on regular copy paper and very carefully cut them out. After die cutting the shapes from paper from Echo Park's For the Record to mount them on, I adhered the letters using my Xyron. I was inspired by the My Minds Eye blue papers. Love the colors. I used flowers from Prima and Stampin' Up. The tiny little vintage style tag is from Stampin' Up also. The letter k is staped on it (for our last name). The ovals and die cuts were sponged with Tim Holtz Brushed Corduroy Distress Ink. The die cuts were cut using Spellbinders Nestabilities. The borders were punched using various punches. After assembling I laced some seam binding through to hook them all together to hang.

This was submitted for the Moxie Fab World's Home Decor Challenge. The deadline has passed, but there are some great projects that were submitted if you want some inspiration.


Thanks for looking! And have a great day!


Sunday, December 5, 2010

Baby Girl Card

I love doing girly cards! My daughter's friend is having a little girl. Yay! I would rather do shabby chic than any other card, so this is perfect for me ;)
I knew I had to use this pink rose paper from Daisy D's. I'm so sad they're not around anymore. They had the best papers. I found the green print and the solid pink in the Olivia by Basic Grey paper pad. For a girl you have to have lace and flowers. The white lace is from a package of various white lace trims from Melissa Frances. The frame is from Unity. I cut it out by hand after stamping it. I sponged on some Tim Holtz Distress Ink. I couldn't find a Unity stamp to use for the sentiment, but this SU stamp fits perfectly! The flowers are from the Fairytale Roses in Orchid and French White. They were sprayed with Glimmer Mist in Peppermint Twist and Vintage Pink. So pretty! The button is from The Girls' Paperie Vintage Buttons. Love them!
Thank you for stopping by! I love company ;)
Have a fabulous day!


Tuesday, November 16, 2010

So Excited for My Sparkly Creation!!!

A few weeks ago I bought this fabulous big pack of paper, My Mind's Eye Signature Christmas Glitter Pad. So sparkly! Then this past weekend I was fortunate enough to go to A Cherry On Top's Warehouse Sale. On the way to the register I saw this fabu pack of chipboard shapes! There are 12 in the pack, they're 9" x 7", and they're $4.99 a pack!!! I knew they were meant for each other!
Once I picked the paper for my first plaque I adhered it with Mod Podge. I cut a coordinating piece for the top and punched a decorative edge. After attaching that I sanded the edges and painted the edges with brown acrylic paint.
I was ready to start decorating it! The fun part!
The circle is punched with a 1 3/4" punch. The stamp is from Unity. The die cut behind that is from PTI. These flowers are French White Fairytale Roses from Prima. I sprayed the dickens out of them with Glimmer Mist! Those brads in the middle of the snowflakes are Basic Grey plain ol' brads. I applied Matte Accents to the top and dipped them in Diamond Dust Glitter for a fun sparkly effect!
After finishing the decorating I punched holes in the top with My Crop a Dile and slipped this gorgeous SU Espresso Satin Ribbon through. I didn't want plain knots, so I put a few stitches in, then wrapped a separate piece around that and stitched that piece.
So there it is. One of my favorite projects so far!
Thanks for looking! I'm so happy when I get company in here ;)